Beta Shadowrun Character Generator NSRCG

Controls   Display   Pages   Definitions   Printing   Options   Q&A   "How Do I"   Bugs

The NSRCG is a SHADOWRUN Character Generator based on 3rd Edition rules. You would use this generator to build new characters or to keep track of existing characters.  Most of the functions are pretty intuitive but just in case….

CONTROLS: 

  • Left and Right Arrow: Use these buttons to move forwards and backwards between the various pages that make up the programs.  Sometimes a page will be skipped; this means that your character doesn’t have access to these pages.  For example, a mundane (non-magic) character cannot access the Magic page or an existing character tries to go back to the Generation page (Cannot be done).
  • “New”:  This button is used to erase all the information on previous characters and allow a fresh start.
  • “Save”:  This button is used to save your character information to a save file.  These typically would have an extension of SR3 and be located in the DATA directory.  To reload a character, see the “LOAD” page.
  • Print”:  This button prints your character out on a HTML file.  See the Printing section.
  • You cannot print your character out until you Finalize them.  This means pressing the Finalize button on the Karma page.  Finalizing migrates your character from a new beginning player to an existing one: All skills, spells, cash, etc are closed out.  An existing character then uses only cash and karma.
  • Options”:  This button calls up the Options page.  You can set various GM options on these screens.  See Options.
  • “Help”:  This button does NOT work at this time.  Anybody want to help?
  • “Quit”:  This button closes the program.  If you haven’t save your character, you’ll be prompted at this time.


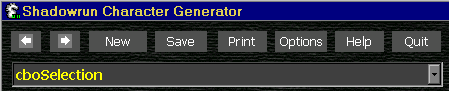
Under these buttons is the Selector bar.  You click on and select a page to immediately jump to that page.  In the event the Selector bar will NOT let you into that page, you are prohibited.  For an explanation, see “Left and Right Arrow”.

Top

DISPLAY PANEL:

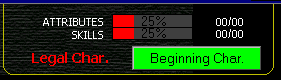
To the right of the controls is the Display panel.

There are two progress bars that either display: Attributes & Skills or Karma & Resources depending on Mode (More on that later).  These bars will show as a percentage; how much you have and how much you’ve spent.  Below the progress bars is a status display and a button.  The status will either be legal or illegal depending on how you built your character.

The button is either Green – Beginning Character, Yellow – Existing Character, or Red – All rules for character generation are turned off.  You can toggle between modes by pushing the button.  There are times when the rules will get in the way; i.e. a non-playing character sheet doesn’t need to be legal. 

Top

PAGES

Load Gen. Sys. Race Basic Edge Attribute Skills Augments Magic Gear Vehicles Decks Contacts Karma

PAGES:

There are many pages available depending on the type of character you are building.  Some will not be accessible to your type of character.  In order, they are:

Load Page: This is the first page displayed.  If you have already generated and saved a character, you can click on the save file name and reload it at this point.  You must double-click the filename to load it.  There are additional settings if you want to change the location of your save files.

Generation system:  There are currently two methods to generate a new character:  Priority & Points based.  You select by clicking on the tabs at the top of the form.

  • Priority: It is easier if you select your priorities from the top, down. Using the arrow keys to move your selection

  •   Points based: The maximum number of points is set in the options. Select the option button you want, enable any features you need.  Save a few points for Edges/Flaws.

Race Selection: Depending on what you selected on the generation system, a number of races will either be enabled or disabled.  You need to select a race before continuing.  Additionally if you selected a Meta-Human (Points based), a list of meta-humans of the type you selected will be displayed.  You need to click on one of them.

Character basic data: This is where you will enter the basic biography information (birth date, height, weight, etc) on your character.  You can also select a street name/s, lifestyles, and enter any credsticks/nuyen you may have gotten.  Also, on this page is the creation/modification dates for your character.

Edges / Flaws: Shadowrun Companion introduced rules for edges/flaws. If you have selected Priority based, your edges/flaws must equal 0.

Attributes:  This page displays your current attributes and modifications.  If you purchase cyber/bioware, your modifications to your INT, STR, etc will display here.  Also displayed are some of the Dice Pools.  The Spell Pool is on the Magic page.  The Control Pool is modified via the Vehicles/Riggers page, etc.  To change your attributes, use the arrow buttons to modify your attributes.  As a new character, you cannot exceed your allotted attribute points. Later, Karma points can be used to purchase enhancements to your attributes.

Skills:  Depending on your selection on the Generation page, you now have a number of skill points to spend.  Select the class of skill and a new list will display in the general box. Select a skill from the general box and a list of specialized skills will display.  If you click on the specialized skill and then click the Add button, both the general skill and the specialized skill will be added to your Selected Skill list, otherwise just the general skill will be added.  If you do not see the skill you want, you can use the Custom button to manually input your skill (Note: this is NOT permanently added to the program’s skill list, for that you have to modify the SKILL.DAT file).  Further increases to your Selected Skill levels are possible via the left/right arrows.  You have active, knowledge, and language skill points to spend. As you select/change your skills, points will be spent appropriately.  Existing characters can add/change skills using karma.

Augmentations:  This is where you add Cyberware and Bioware.

  • Cyberware:  Click on the “+” to open category and continue until you find the item you want.  Click on the item and a description will appear in the information window below.  Select the grade of cyberware you require, note the essence change, and click on the Add button to add the item to your character.  Any modifications to your attributes will appear on the Attributes page.  Note: Cyberware can be disabled, so it has a separate listing)

  • Bioware: This operates in the same fashion as Cyberware.  See above.

 Magic: There are 5 tabs here: Selection/Tradition, Spells, Physical Adept, Info, Magical Items.

  •  Selection/Tradition: Depending on what you selected on the Generation page, you can select what type of mage/shaman and/or type of adept.  Magic modifiers and dice pools are also displayed here. HELP: I need someone to enter all the shaman info: bonuses & penalties.

  •  Spells: Depending on what you selected, you are allotted a certain number of spell points. Select a category first and then a list of spells will be displayed.  Click on the desired spell that you want and click the Add button.  The spell will be added to your Selected spells list.  To further modify, use the left/right arrows to change the force level.  An existing character can use karma to purchase additional spells or to change current spells.

  •  Physical Adept: If you selected a physical adept, this tab will be enabled.  Select the abilities on the left side and click the Add button.  An existing character can get additional points to spend via karma.

  • Info: not implemented yet.

  •  Magical Items: not implemented yet.  Magical libraries, spirits, foci, and other magical purchased items will be here.

Gear:  Depending on your character’s selection on the Generation page, you now have a level of resources or nuyen to spend. You can purchase gear, including weapons.  Click on Available Gear, The “+” signs indicate that you can further open each category (by clicking)  until you find a final category without a “+” sign.  As you click on a category, a list of item opens in the box next to it.  Clicking once will display the information in the lower left hand side.  Add the item to your list by clicking the Add button. 

  •  If you select a gun, you can add an internal Smartlink I or II to it.  Select in your listing and then click on the Smart1 or Smart2 buttons.   The costs and weight of the gun will be changed appropriately.

  • The program will track and print carried weight.  There is a line displayed in your gear box “Carried Gear Below”.  Using the up/down arrows, move your items above or below the line and your carried weight will change accordingly.

Vehicles / Rigger:  This is where you purchase vehicles and drones.  Another tab will display any Rigger information.  Note: Riggers need to get a VCR on the Cyberware tab on the Augmentations page. 

Decks / Deckers: This is where you purchase decks, programs, and customize your deck.  The first tab (Decks & Programs) is where you purchase your deck and associated programs/options.  The second tab (Decker Info) is where you customize the settings for your deck.  Additionally, the deck’s information is displayed as well the Hacking Pool and modifications.  Note: ASSIST headware is purchased in Cyberware on the Augments page.

Contacts: All new characters start with two level 1 contacts for free.  Additional contacts can be purchased.  This page is where all information on your contacts is kept.  The box on the left is your list of contacts.  You can:

  • Edit: Click on a contact in your list. Change the information on the right and then click on the Update button

  • Delete: Click on a contact on your list.  Click on the Remove button.

  • Add: Click on the Clear button.  Change the information on the right and click on the Add button.

In the middle of the right hand side is a box.  In the box are two selector bars.  The first bar selects a category.  A new list will appear in the second bar.  Selecting a occupation in this bar will make that the occupation for your contact (last box).

Karma / Existing Characters: This page is where you will find the Finalize button (see Print button), Karma Pool and modifiers, and Karma purchase/sells.  You can:

  • Remove karma pool permanently

  • Enter your good karma values

  • Finalize your character

  • See your current karma pool

  • Buy karma points

  • Sell karma points

  • Buy an Adept point with karma

  • Buy an edge point with karma

  • Remove karma from your total karma from “burns” or failures

Many of the pages have up/down arrows next to your selection boxes.  These buttons allow you to rearrange the order of your skills/gear/spells/etc. An alternative to clicking the Add button is double clicking the item instead.  Removal of an item from your lists is done by clicking on it, then clicking on the now, enabled Remove button.

Top

Definitions:

  • Selection: By clicking on a item in a box or list, you are “selecting” it.

  • Enable: If a button or control is “greyed out”, then the control is not working or is disabled.

  •  GM: Game Master for the Shadowrun game.

Top

PRINTING:  

After the character is finalized (see Karma page), a “Print to HTML file “ form appears. 

  • Originally, multiple output formats were going to be available.  To date, only Standard is available.

  • Graphics can be inserted in the printout (a request) or not.

  • There are check boxes for Main Page or Separate Page.  The program will print in a separate HTML page if: 1) that section is checked under the Separate page column or 2) If the number of items to be printed is more than the value set in the options page (Options: Program Settings: Trigger).

  •  If a separate HTML file is generated, it can be accessed via the hyperlink on the main character’s HTML page.  NOTE: It will have to be regenerated if you print another character with separate HTML files later.

  • These is now an option to output to an Excel file.  This is a prototype.  I need a better layout so if you are an EXCEL guru, email me at  mcmackie@hotmail.com.

Top

OPTIONS:

This form is displayed when the Options button is pressed.  The GM should determine these values. There are 4 sections:

Books/Modules:  This lists the books and modules are allowed/disallowed from the program.  If, for example, you wanted to disallow “Man and Machine”, you would click on it, click on the Disallow “>>” button and then click on the “Save Book List” button.  The process of adding a module is the reverse using the Allow “<<” button.  Note: The largest listing of items is the Shadowrun 2nd Ed.  (Default for unknown module).

Program Settings:

  • Default Initial Character Points: The Points based system starts beginning characters with this many points.

  • Default GIF Character file: the default GIF filename for the picture included in the HTML print file.

  • Max. Edge/Flaw Points: maximum number of edge or flaw absolute total points from zero.  Default is 6.

  • Max. Num of Edges/Flaws: maximum number of edges or flaws allowed. Default is 5.  This means you can have 5 edges and 5 flaws, no more.

  • Num. Items Trigger Separate Page: the number of lines on a sheet before it triggers a separate HTML page (see PRINTING).

  • Use Street Price: This check box determines whether the Street Index is used to calculate the price.  Default setting is on.

Karma Settings: 

-         Sell Karma for Nuyen number: Determine how much nuyen a player gets for each karma point.  For karma rich but cash poor players (Street Sams).

-         Buy Karma point cost: Set how much nuyen for each karma point bought.  For cash rich but karma poor players (Mages).

-         Adept cost: the cost, in karma points, for each PhysAd point.

-         Edge cost: the cost, in karma points, for each edge point.

Character Creation: The only setting here is the name of the creator.  This value is unused but kept for compatibility reasons.

There are two buttons at the bottom of the page.  The Apply button applies the values and saves the settings to your SRCG.INI file.  The Cancel button cancels the update and resets to the original values.  Both buttons will return you the main program.

Top

QUESTIONS:

  1. The Bioware/Cyberware is not adding/subtracting essence/Bio-index correctly.  What is wrong?  Answer:  If you are a German or Finnish user, see the section: Foreign Windows Bug.
  2. The Bioware:Adrenal Gland does not modify my attributes.  What is wrong?  Answer: The Adrenal Gland only works when triggered (you take damage).  The attributes only increase when triggered, so they will not show up in your character’s sheet.  The program does print them for your convenience.
  3. I want to use the meta-variants from Shadowrun Companion! You have to first use the points system (Menu bar Character -> Points ON).
  4. Hey! I don't see this skill/gear/object in the listings! What’s wrong? All of the DAT files (Bioware.dat, Gear.dat, Skills.dat, Spells.dat, ETC) are text files. Anybody can modify these files with a simple text editor (I use Editpad). Warning: these files are VERY position dependent so exercise caution. NOTE: Before ANY changes, backup the file as you might completely 'frag' it if you're not careful. Any changes or additions to the various files, please let me know so I can make the appropriate changes in the 'Master' files for other players to enjoy (use)!
  5. The Edge: Lightning Reflexes does not modify linked attributes, what gives?  Lightning Reflexes only apply to surprise tests so they don't modify your overall (printed) stats.
  6. I don’t see the Skill I need on the Skills page.  What do I have to do?  You could use the Custom button but if you need the skill over and over again, the best thing to do is to change the SKILL.DAT file.  The format is simple.  Base skills start in the first column and concentrations have a space in their name.  See SKILL.DAT for details.  
  7. I want to use Beta or Delta Cyberware.  The options are turn off.  What gives? New characters are NOT allowed this level of cyberware.  Once your character becomes an existing (continuing), s/he is allowed access.  Also, if you put the program into Norules mode, you can over-ride.

Top

HOW DO I:

Top

FEATURES:

  1. Generated to SR3 compliant standards
  2. Weapon/Spell/Cyber/PhysAdept Printouts
  3. Weapons bundled w/Accessories
  4. Printed HTML SR3 Character Sheets
  5. Character Generation: Priority and Points System
  6. Support for Edges/Flaws
  7. Support for Ghouls/Shapeshifters/Metas
  8. Range values for weapons included on output
  9. Fixed Netscape bug that affected HTML output (thanks to Jim Burke)
  10. Cyber/Bioware outlines used for selection. Coding thanks to James Lee.
  11. My intention is to migrate to XML and Access.for testing purposes using some of Paolo's stuff. stay tuned.
  12. You can arrange gear as either carried or not.

Top

BUGS:

Foreign Windows (German/Finish especially): German users have locale settings that conflict with the program. They use "," for decimal notation rather than "." as the US does. Since I store Essence costs and bioware index costs as decimals, these are NOT translated correctly! FIX: Better fix: (Goto START/CONTROL PANEL/REGIONAL SETTINGS/ and click on Number. Change the decimal notation from ","(comma) to "."(period)  ) I had the german instructions but lost them. OR.... German users MUST change by hand Bioware.DAT & Cyber.DAT. Simply replace "." with "," for the costs. Sorry, I find it difficult to automatically fix this without getting into locale settings and language checks (I really don't want to learn all of this). It used to work with the VAL function but German NT Windows break the application. This is the fastest fix! Anybody want to help?

GEAR, CYBER, OR BIO won't load/work: The program uses a control msoutl32.ocx. This control sometimes doesn't install correctly. FIX: Uninstall NSRCG, then re-install the complete program NSRCG.ZIP. As a matter of fact, try this anyways if you're having problems. (Can't hurt, might work)

Top